Showing posts with label Buildings. Show all posts

Monday, 13 February 2012

How to Build a Bridge

With my push to make my campaign games more "realistic" in terms of the terrain that's fought over, I realised I needed a bridge.


But that was only the beginning of the thought process as the bridge size was going to be critical. Too narrow and it might look good, but the game played on it would be frustrating as units queued up to fight a one on one battle in the middle.

I decided to go for a bridge wide enough for three normal units (or a combination of larger and smaller units).

Here's how I went about it:

1) Decide that what you need is a preposterously over sized bridge.

2) Get some foam board from a hobby or art shop (Hobbeycraft sells this in England).

3) Gather a shockingly large amount of spare wood you happen to have lying around.


4) Use a craft knife to cut the foamboard into the appropriate sizes. My bridge is 17" wide. The level section is 22" long and the ramps are about 11.5".


5) Eat some Bran Flakes.

6) Glue on "hinges" made from cardboard. These allow the bridge to be set at different heights with the ramps then at varying pitch.

7) Write a note to yourself to not glue wood on later that will completely undermine the original plan to have bridge as adjustable (I missed this step).


8) Pile two paint pots up into an intriguing paint pot pyramid.


9) Reinforce the underside with hard balsa wood pieces while taking a refreshing drink of lemon.


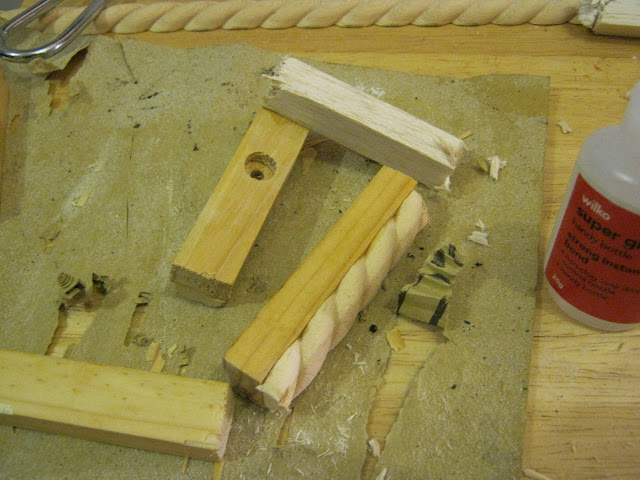
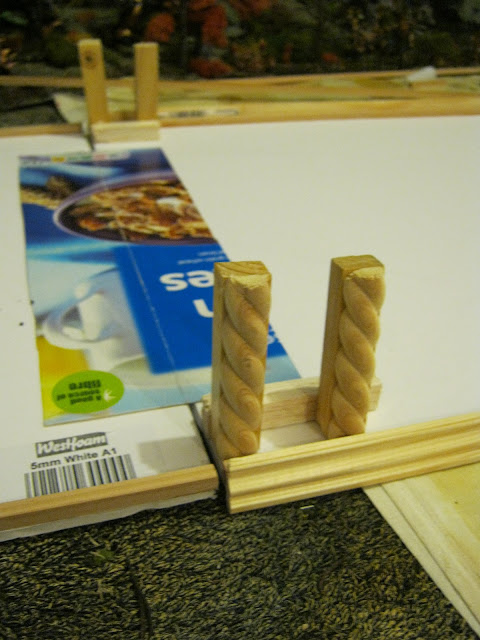
10) Cut some appropriately shaped moulding wood to and hang from the side of the bridge to give a decorative look and an illusion of thickness.

11) Use old VHS video tapes to hold the wood in place while it glues.


12) Add balsa wood on the edges of the upper side of the bridge to make an edge to it.

13) Remember to put that Homebase receipt someplace safe.


14) Make some legs from wood and decorate them with more moulding.


15) Realise the legs are too narrow and rip them off.

16) Take a photo and email to friends so they think you're a cool dude. Place miniatures and tower on bridge for scale demonstration. Ensure VHS tapes remain in shot for nostalgic purposes. 


17) Cut some new legs from insulation foam using a saw. Cut grooves in them to make them look like layered stone and paint them accordingly, dry brushing through various shades of grey.


18) Add more decorative moulding to the top of the bridge and use paper sheets to cover the cracks where the foam board joins are.


19) Paint the parts of the bridge that are going to be exposed black then dry brush through several shades of grey.

20) Try to ignore discarded fragments of broken legs.


21) Buy a black towel (or towelling material) of the appropriate size and dry brush Scorched Brown (I used a duplicated colour from B&Q). This is also how I did my war board blanket by the way. 


22) Drybrush the towel Bestial Brown in patches.


23) Take a bath. Use towel to dry yourself.

24) Place over a radiator.

25) When dry, drybrush the towel Bubonic Brown in overlapping patches so that all previous colours are still visible. 


26) Drybrush Bleached Bone in the same way. 


27) Put the towel on the bridge and set it up.


28) Realise it is preposterously big and you may have made a terrible mistake.

29) Console yourself with the fact that it is chuffing cool!

Sunday, 18 December 2011

Spotlight On: A Different Kind of Screaming Bell

Heh.


Many years ago I bought a bunch of Warhammer miniatures of a kid in Ferndown.At the time I wasn't into Warhammer Fantasy and this act kind of catapulted me into it.

Part of that BIG purchase was the original Skaven Screaming Bell (this isn't my paint job by the way).


But it was a bit static for my tastes so I made a rather more dramatic conversion. 


But when the new Screaming Bell came out I felt the ante had been upped. I was  going to have to go a long way to outdo it (if that was even possible). I got the kit and made the Plague Furnace, then looked at the spare parts remaining and rubbed my hands together. 


The thing that inspired me the most here was a line from the army book: "It is from these unholy altars that the Grey Seers preach their plans of total domination in the name of the Great Horned Rat." I wanted it to be something that they use outside of battle for their dark rituals and I wanted it to be a huge centrepiece (while still sitting on the correct base size). 

Here's the Grey Seer's pulpit. 


The banner at the top on those big spears was a late addition and I had to really rein myself in. It was going to be much bigger but I realised it would then be too big to stand on my biggest shelf! 


The banner is made from kitchen towel ripped into little chunks and hung over a piece of thread, then hardened with super glue.


The bell on the new Screaming Bell was so cool that I had to use it and I could have used it to replace my original one. But I really wanted to go all out on bells. With two warpstone bells and a whole bunch of other supporting bells of different sizes, we can imagine the vast and cacophonous din that would break out across the battlefield, and also take place at their moonlit rituals.


I toyed with using the old bell ringer on the little platform in front of this bell for a while but in the ens felt this bowl of steaming warpstone worked better.


The extra bells are from Christmas decorations. They're painted Tin Bitz with Boltgun Metal stippling.


(I love how this picture came out - it really captures the sense of scale) 


As you can see, it all fits neatly (though perhaps a tad improbably) onto the normal base - the original carriage from the original Screaming Bell.


Now the Rat Ogre has this cool chain coming up from his hand so I decided it would be a shame not to use it. 

I got some thin chain from B&Q, prised open a link and joined it to the end then positioned everything so that it could look like he was ringing the upper bell. 

On second thought I added a secondary chain hanging down to the lower bell too. 

I'm reasonably pleased by how this came out. But not entirely.


I built the platform (from balsa wood) so that the rat ogre could be gripping onto the back of it, as he does to the official model.

He must go so deaf between those massive bells!

 
And there you have it. I'd like to say it's how you can get 2 models for the price of one, but after getting the original Screaming Bell, all the balsa wood, the extra parts, the chain and the big bells, then spending countless hours building and painting the thing, you MAY think it's not worth it. 

But I love it so who cares!

Now all I have to do is paint another 26-odd Clanrats to push it along!


Tuesday, 18 January 2011

Building the Market Hall

My Market Hall has already been seen here on Last Chance War as part of the Still Water scenario but I thought it might be interesting to look at the process of building it in the first place.

It was a long job that took quite bit of commitment and involved a long break in the middle when I couldn't be bothered to finish it.

The base was made from two pieces of foam board, one cut slightly smaller than the other to create a step up. I then drew a grid on the upper layer and scored along each line to make flagstones. At the corners of each flagstone I pressed down with the tip of a Stanley knife to make a little dip.

I used plastic cake pillars to support the upper structure. Originally these were much narrower wooden struts but they looked a bit amateurish so I dumped them. You'll notice on the picture that there are little squares of paper glued over some of the foam board squares. This was to cover the scar left when I pulled off the more numerous wooden pillars.


The staircase is shown here. It's basically cereal box card with balsa wood (bought from a model shop). I scored every piece of wood with my knife to give more natural texture. The door was carefully scaled to a Games Workshop door and made from balsa wood too.

The main body of the building was made from stiff card. I held the joints in place using pins while the glue dried then added balsa wood timber framing all round. The windows are made by cutting wire mesh into rectangles and gluing a frame round them so that they look like that nice leaded window effect you see sometimes.

When all the wood was done I used multi-purpose powdered filler to add texture to the walls (otherwise they'd have been too smooth).


The roof was made from overlapping strips of corrugated card I bought from Hobbycraft over the top of a bit of pizza box. I bent over the each end so that it would look a bit more ornate and old-fashioned. At this time I also added a tower. I felt it was a bit low, long and flat without it, although for the entire time I was building the tower I worried it didn't look so good.


I made the tower from foam board and used the same techniques as the main part for the walls and windows. The roof was made to be uneven with a gentler slope on one side. I also added an extra kink to make it look more interesting.


The trickiest part was the roof shutters. I wanted these to be opening and closing. I made the shutter and glued a piece of paper underneath it that stuck out almost the same length again. I folded the paper over underneath it and glued it into the shutter cavity under a piece of black card. That made a sort of hinge. I prop them open with half matchsticks but if they are removed the shutters close.


I wanted to go for a subdued naturalistic colour scheme so I used dark browns and dull creams. The red roof tiles match in with all my other buildings to give a unified look.

It's a bit of a monster but I think I like it. And it certainly dominates the battlefield!

Thursday, 6 January 2011

Still Water

In the far south east of the Border Princes, perilously close to Fortress Malefic, lies the sleepy little town of Still Water. It is only a small cluster of buildings centred round a market hall but it is an old settlement and one that the villagers have long been proud of.

Still Water lies on the bank of Blood River and is named for the way the river slows there, the plain almost perfectly flat around it. The village is the last human settlement in the southeast before the Badlands are reached and the lane that leads to it is a dead end. Following the lane west along the riverbank it meanders alongside the water toward the other scattered villages in the south and west. Travel to the north is greatly impeded by Blood River and no bridges wide enough for troop movement can be found until the south road is reached far far to the west. There is no ford at Still Water and this would normally mean that the town would hold little strategic value, being only small and fairly poor. Sadly this is not the case.

As the river runs so slowly here, although it is deep in parts, Still Water is still the best crossing point east of the Blood River Bogs. With Fortress Malefic to its south and beyond that the Badlands and the Land of the Dead, Still Water has had to weather a bitter and difficult time as the forces of the vampire counts have used it as a crossing point again and again.

Still Water’s most significant landmark is its majestic market hall. This huge building follows a design fairly common in the Border Princes but here in Still Water perhaps more use is made of it than elsewhere. For much of the year the market hall is used for storage of produce, the lower open floor utilised as a place of sale and bartering to the southern villages. Sales here are made of cattle and grain and of vegetables, fruit and milk. On festival days, the upper hall is used for celebrations, hosting dances that run on into the small hours and attract hunters and shepherds from many leagues around. For the rest of the year it is a focus of the community, providing a meeting place for the village council and general village hall for other purposes. It can be made to be very warm in winter and the roof shutters keep it cool in the summer. Its high tower gives a good view across the plain and enables the spotter always stationed there to alert the village folk of impending threats.

The Last Chance War has not been kind to the villagers of Still Water but paradoxically has allowed them to continue something of a sparse existence due to the nature of their closest neighbours. When the cry of the spotter alerts the villagers of approaching enemies, the folk flee from their houses and hide themselves in shallow underground chambers near to the graveyard covered in foliage. Enemies are not fought off but are avoided and given free reign to move through and past the river. In this way the villagers have stayed alive. Because their town lies so close to the heart of the realm controlled for so many months by the vampire counts, they have actually been able to avoid most threats. The zombies and skeletons have no need of looting their provisions after all.

Now however, the Skaven have taken up residence in Fortress Malefic, vicious scavengers all, and suddenly the existence of Still Water and its citizens is very much under threat. Survival in these times is a privilege, not a right, and the villagers look fearfully both north and south, wondering from which direction their doom will come. The vampires and the ratmen are soon to clash, the undead racing south to reclaim their fortress, the Skaven pushing north to see them off. With Still Water in such a critical position, it is more than likely to be the site of their inevitable clash. And woe betide the villagers then!

Friday, 31 December 2010

A Walk Down the Village Street

After a medium long break from house building, I have finally finished the first of my new style Games Workshop scale houses. This one was based on a house from the amazing Pardulon website. If only I could afford it I would snap up all of their stuff! It's been an arduous process building my own but I'm glad now it's done.


And now my son Horatio has recaptured the house building bug! He's working on a new house for me and this has prompted me to go out and buy materials to finish the market hall I've been doing and maybe start another house similar to this one!